
I'm a fan of pitching and the sport of baseball for most of my life and have been wanting to own one of these pitching pocket 9 hole tools for awhile now.
I am also an OverseasFan, so that makes ordering things online in the USA a bit expensive, especially when they are heavy or large shipments.
A seconde obstacle is that these things can be found online for between $200-$350, which is not a simple click and buy to help your local pitchers out.
I have been coaching pitching for quite a few years now and you can imagine the difficulties of securing a bullpen catcher for younger pitchers.
This tool fixes that problem.
I did some research around the sizing, materials I might use here locally, and settled on last weekend to kick off my Do-It-Yourself (DYI) project to build a pitching pocket. I would be remiss if I didn't share this online so that many of you others out there would be able to make your very own pitching pocket too.
Let's take a look, from start to finish, how you too can build your own pitching pocket with materials found in almost any home improvements store (either in US or in Europe where I built it) in just a day and stay under the 80 euro mark.
The planning

I set out with a look at the width and height of each of the pockets, then sorted out how big it is with 3x3 grid to establish the parts I would need for the frame. Then I looked at a base with two separate legs using the same parts, but needing to be the right height as I was not looking to make this adjustable for any height.
Each pocket I designed to be 16cm wide by 24cm high. This put the pocket frame at 48cm wide by 72cm tall, but I rounded that off to give me some room for the eventual padding and tarp wrapping around the finished frame. This means I was looking to design a 50cm wide by 75cm tall pitching pocket frame with nine holes.
Next was to look at designing the feet, one for each side of the frame and big enough to support eventual pitching impact without breaking off or flipping over the frame. I would need legs with a heights of 50cm, and then the feet themselves would extend out the front and back for 50cm each. So the base was 100cm front to back and I planned on having to weight them down with something to make sure it was heavy enough to withstand pitching impact.
To weight down the base, the plan would be to use sand in the pipes and seal them off with plugs. Each foot would then be inserted into a PVC joint, and be removable for transport.
Next up, the shopping list.
The parts
The following shopping list I put together includes everything you need to complete your own pitching pocket DYI project:- PVC pipes and connectors, all sized for 50mm pipes, color grey
- 3x 2m long 50mm PVC pipes (6.49 euro each)
- 6x end caps 50mm (1.39 euro each)
- 4x t-connectors, 90 degrees, 50mm by 50mm (3.19 each)
- 2x corner connectors, 90 degrees, 50mm (2.19 each)
- 1x 25kg bag of sand, only size they sold here (1.79 euro)
- 4x 1m long 35mm pipe insolation foam tubes (2.19 euro each)
- 1x package of large 300mm black zip ties, 50 pieces (6.38 euros)
- 1x plastic tarp, strong one, blue, 2m by 3m (5.09 euros)
- 4x bungee cords (6.38 euros)
- 1x PVC pipe glue (6.99 euros)
- 1x large piece of backstop netting

The last two items I had laying around my garage, so that was a money saver. The netting can be anything with small enough holes to hold a baseball. Finally, these prices (total here was 77.15 euros) may vary depending on your shopping experience locally, so you might even be able to do this project for cheaper.
Now on to the build.
The build

The first step was to cut all the frame pieces to the correct lengths as follows using a simple wood hand saw. You don't even need to file off the edges as every end piece goes into a connector or has a cap on it. the layout means the following pieces were needed:
- 2x 50cm pipes - for the top and the bottom of the pitching pocket frame
- 2x 72cm pipes - for the right and the left side of the pitching pocket frame
- 4x 50 cm pipes - for the legs and feet. Two legs are inserted into the bottom of the pitching frames t-connectors and the feet are joined by a t connector on the ground.
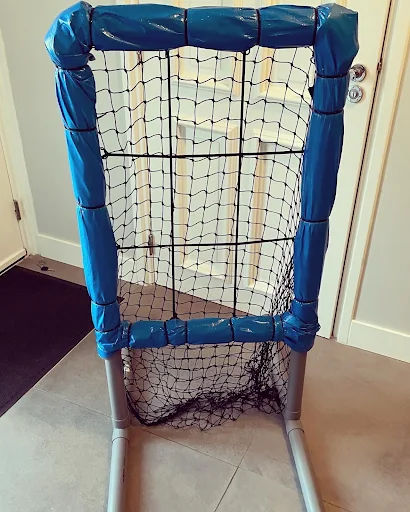
After cutting the pieces to specifications above, mock up the pitching pocket frame, legs, and feet without gluing any of the parts. Use the bungee cords as shown to get an idea of the sizes and to make sure you can form all nine of the pockets to the correct sizes as shown in the image.
Once satisfied with the sizing, remove the bungee cords to glue the pitching frame together. Use two corner connectors for the top of the frame and two t-connectors for the bottom of the frame. I put the PVC glue in the connector pieces and then slide the pipes into the connectors to ensure there was no glue outside of the connections.
Next, place the pvc pipe insulation around the right and left sides of the pitching frame, positioning it to keep the padding facing the front where the balls might strike the pipes. Using a Stanley knife, trim the insulation to fit each area you are attaching. Also note, that while there is some adhesive on the insulation, I used zip ties to ensure that this does not move any more.
Pay special attention to trimming smaller corner pieces of insulation and secure these with zip ties to complete the protection of the PVC pipes from ball strikes. Note that if you leave this padding insulation exposed to pitching later, the spin on the ball will tear it. We'll cover this later with the tarp to ensure maximum durability of your pitching frame.
The legs are up next. Start with a 50cm piece of PVC and glue one end closed with a cap. Fill the pipe with sand and then glue it into one of the t-connectors. Laying that carefully aside so as not to lose the sand inside, do the same with another 50cm piece and then glue that into the opposite side of the t-connector. If you look down into the remaining hole from the t-connector you should see sand. Now glue another 50cm piece of PVC into that last hole from the t-connector and fill it with sand. For transport you can use an end cap piece to keep the sand in and then remove the cap to insert this leg into the pitching pocket frame bottom.
To attach the netting I chose to lay it out on the floor with the pitching pocket frame on top of it and cutting out enough to create one big oversized bag behind the pitching pocket. This was to not have to attach anything to the bungee cords and simplify the netting into a single basket behind the pitching pocket.
Note that it's sized to hang down below the nine holes and using zip ties it's attached to the frame. the bottom is closed up on the sides but not entirely on the bottom so that when you catch pitched balls they lose energy into the extra netting space and then drop to the bottom of the net bag you create. By leaving a hole in the center of the bottom, pitchers can walk around the back and shake out the bals in the netting through that hole.

The results
You now have a pitching pocket with nine holes, a net to catch the balls, and detachable legs on both sides that make transport to and from your bullpen sessions easy. The only thing left to do is to take it out and trial it with real pitchers.
It turns out that zip ties will occasionally be broken by direct hits, but for the rest it's a perfect solution working with both slow and higher velocity throwers without moving, falling over, or having detrimental effects from impact to the frame.
Possible improvements might be using string or rope to secure the tarp and preventing zip tie breakage. I have no shortage of zip ties so I really don't mind the occasional fix here and there.

I now hope this helps you too with putting together a cost effective PVC based pitching pocket with nine holes and not breaking the bank.
No comments:
Post a Comment
Note: Only a member of this blog may post a comment.