
Decision management developer tooling
This demo project showcases the tooling available in Red Hat Decision Manager implementing complex decision logic which can be exposed as a decision service.

Furthermore, this demo provides a Node.js client application written in AngularJS and PatternFly that showcases how web applications can consume decision services deployed on the decision server.
This demo installs the Red Hat Decision Manager and a Node.js front end application on OpenShift Container Platform on your local machine. It's leveraging CodeReady Containers and delivers a fully functioning container-native development experience.
Install on CodeReady Containers
There are two options to install and run this project on the OpenShift Container Platform (OCP); use your own existing installation or to install on CodeReady Containers which provides you with a local OCP cluster.

- Ensure you have a CodeReady Containers installation:
-
your own CodeReady Containers installation, if using this you just need to set the variables to point to it in init.{sh|bat} script.
-
Run 'init.sh' or 'init.bat' file. 'init.bat' must be run with Administrative privileges:
   # If using the CodeReady Containers installation, just ensure a correctly set cluster
   # address for the HOST_IP variable at the top of the init.{sh|bat} files, for example:
   #
   # HOST_IP=api.crc.testing
   #
   # Now just run the script without arguments and it picks up that hostname as follows:
   #
   $ ./init.sh
Now log in to Red Hat Decision Manager to start developing containerized process automation projects (the address will be generated by OCP):
- CodeReady Container example: https://crc-quick-loan-bank-demo-appdev-in-cloud.apps-crc.testing ( u:erics / p:redhatdm1! )
Testing API access
-
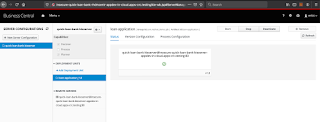
Log in to the decision manager business central dashboard at: http://insecure-quick-loan-bank-rhdmcentr-appdev-in-cloud.apps-crc.testing with u:erics and p:redhatdm1!
-
Click on the "loan-application" project to open the Loan Application Demo project.
-
The project has simple data model (Loan & Applicant) and single decision table (loan-application) which contains the loan approval rule set.
-
Build and deploy version 1.0 of the project. Click on the "Build and Deploy" in the upper right corner.
-
Go to "Menu -> Deploy -> Execution Servers" repository to see the 'loan-application_1.0' KIE Container deployed on the Decision Server.
-
The decision server provides a Swagger UI that documents the full RESTful interface exposed by the server at: http://insecure-quick-loan-bank-kieserver-appdev-in-cloud.apps-crc.testing/docs
-
In the Swagger UI:
- navigate to "KIE Server and KIE containers"
- expand the "GET" operation for resource "/server/containers"
- click on "Try it out"
- leave the parameters blank and click on "Execute"
- when asked for credentials use: Username: erics, Password: redhatdm!
- observe the response, which lists the KIE Containers deployed on the server and their status (STARTED, STOPPED).
-
We can use the Swagger UI to test our Loan Approval Decision Service. In the Swagger UI:
- navigate to "KIE session assets"
- expand the "POST" operation for resource "/server/containers/instances/{id}"
- click on "Try it out"
- set the "id" parameter to the name of the KIE Container that hosts our rules, in this case
loan-application_1.0. - set "Parameter content type" to
application/json. - set "Response content type" to
application/json - use the following request as the "body" parameter. Note that the
Loanobject has itsapprovedattribute set tofalse:
{ "lookup": "default-stateless-ksession", "commands": [ { "insert": { "object": { "com.redhat.demo.qlb.loan_application.model.Applicant": { "creditScore":410, "name":"Billy Bob", "age":40, "yearlyIncome":90000 } }, "out-identifier":"applicant" } }, { "insert": { "object": { "com.redhat.demo.qlb.loan_application.model.Loan": { "amount":250000, "duration":10 } }, "out-identifier":"loan" } }, { "start-process" : { "processId" : "loan-application.loan-application-decision-flow", "parameter" : [ ], "out-identifier" : null } } ] } - observe the result. The Quick Loan Bank rules have fired and determined that, based on the credit score of the
application, and the amount of the loan, the loan can be approved. The
approvedattribute of theLoanhas been set totrue.

Exploring the front end UI
-
Log in to the decision manager business central dashboard at: http://insecure-quick-loan-bank-rhdmcentr-appdev-in-cloud.apps-crc.testing with u:erics and p:redhatdm1!
-
Click on the "loan-application" project to open the Loan Application Demo project.

-
The project has simple data model (Loan & Applicant) and single decision table (loan-application) which contains the loan approval rule set.
-
Build and deploy version 1.0 of the project. Click on the "Build and Deploy" in the upper right corner.
-
Go to "Menu -> Deploy -> Execution Servers" repository to see the 'loan-application_1.0' KIE Container deployed on the Decision Server.
-
Open the deployed Quick Loan Bank application form: http://qlb-client-application-appdev-in-cloud.apps-crc.testing
-
Fill in the form as follows and submit for evaluation:
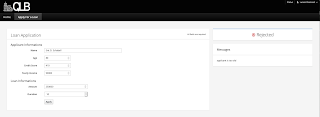
Name: Eric D. Schabell

Age: 40

Credit Score: 410

Yearly Income: 90000

Amount: 250000

Duration: 10


Try to enter different values to see a loan get disapproved, for example, change above applicant age from 40 to 80 for
rejection based on age.
This concludes the tour of our Quick Loan Bank example with a Node.js front end and decision management back end. Looking for more content to get started with Red Hat Decision Manager? Try one of these online workshops to build more projects from scratch.