As a consistent user and developer on the OpenShift platform over the years, I've tried helping users by sharing my application development content as we've journeyed from
cartridges all the way to
container base development.
With container based development we've also transitioned from using templates to define how to deploy our tooling and applications, to operators. There are many examples of how to work with the templated versions of our applications around decision management and process automation found on Red Hat Demo Central and JBoss Demo Central.
Over the releases of OpenShift 4.x we've seen that operators have become the preferred method of packaging, deploying and managing a Kubernetes-native, thus OpenShift, application. With this in mind it felt like time to explore and update existing demos and example projects to employ the provided operators for installation and runtime.
In this series of articles I'll be providing a walk through what it is to use the latest tooling provided by the business automation operator on the OpenShift Container Platform. We'll install the operator by hand, start instances of the decision management and process automation tooling using the OpenShift console, explore command line automation of installing, starting, and configuring the same tooling from the command line, and share a fully automated process automation tooling installation with pre-installed example project.
In the previous article we've installed the business automation operator in the OpenShift web console and installed one of the provided tools in that operator. Now let's install the other tooling provided by this operator, the Red Hat Process Automation Manager.
Installing process automation tooling
After logging in to the OpenShift console you should be in the
Administrator view. Open the left menu entry
Operators -> OperatorHub -> Installed Operators, and ensure that you have selected the
Project: default to see the installed business automation operator from
part 1:
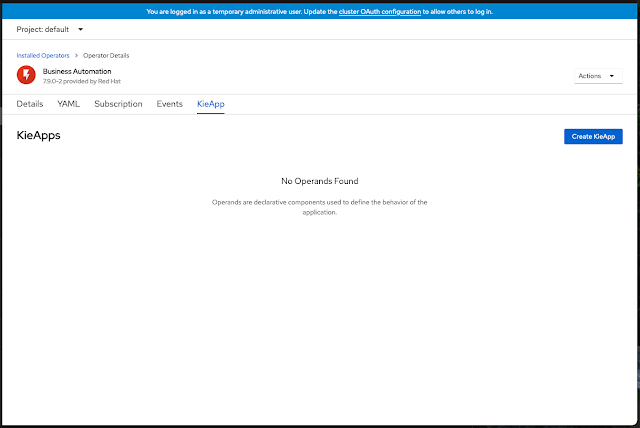
If you click on KieApp on the far right under Provided API's you'll be presented with the details of the operator and viewing the tab KieApp where you find a button on the right labelled Create KieApp:
This button is where you can select to install one of the offered tooling applications under the provided listing of
Environments. Now we're going to be installing the decision management authoring environment using the administration console, so click on
Create KieApp to get started:
There are just a few fields we want to provide before we Create our decision management operator based installation. Note that a few are required and marked with a red asterisk. The following need to be filled in and are shown in the following screenshot:
- Name: rhpam-authoring
- Labels: app=rhpam-authoring
- Environment: rhpam-authoring (choose from provided menu)
- Common Config -> Admin Password: redhatpam1! (open this section with right arrow)
- Common Config -> Admin User: erics
Now to start this installation, click on the
Create button at the bottom. You're presented with a screen showing the installation of your application has started using the business automation operator:
To watch the pods and containers installing, view events, check logs, and more we'll need to move over to the Developer view using the drop down menu at the top left:
You see that the business automation operator has started a process automation authoring environment that then is using a separately deployed KieServer. If you click on the bottom rhpam-...-rhpamcentr it opens a pane on the right for viewing details (feel free to explore the tabs and links to learn about the start up of the process automation tooling containers and pods. When it's fully installed and ready, you'll notice a dark blue circle will fill in a ring around that item and that the Details tab shows the pod has scaled from 0 to 1 indicating that one instance is running:
On the Resource tab you'll find a route link to open the business central console for this tooling:
If you open that link in your browser (it's https so you have to accept the unknown certificate first in some browsers to open the link), you are provided with the business central login screen. Use your password and user name (u: erics / p: redhatpam1! if you followed above instructions) to log in:
Finally, you can verify the installation is fully working by clicking on the top component to open the rhpam-authoring-kieserver details pane on the right and open the route url listed at the bottom of the Resources tab:
If you open that link in your browser (it's https so you have to accept the unknown certificate first in some browsers to open the link), then add /docs to the end of that address it will open the KieServer API documentation:
That completes our tour of installing process automation tooling from the provided operator, but if you want to explore more about using the tooling you can try this
free online workshop.
When you are done exploring the process automation tooling, you can delete this KieApp we've created to make room for our next installation. Click on the box surrounding the two process automation tooling pods to open the KieApp pane on the right. There is an Actions drop-down menu on the top right where you can delete this KieApp, confirm in the following pop-up by clicking the Delete button, and it will remove it:
You're now left with just the business automation operator installed and are ready for the next article in this series.
What's next?


No comments:
Post a Comment
Note: Only a member of this blog may post a comment.