
One of the most important building blocks for a process project is data. It could be argued that this is a fact for any application development project, but it’s essential for a process project because, by definition, a process is receiving, acting on, moving, manipulating and modifying data constantly during its lifecycle. This data needs to be in a form that can be easily understood by all involved in designing and building the process project. The form the data is put into is called a Data Model, which is a part of every computer science student’s education, learning how to formally model data.
The actual discovery of data that’s part of the process you’re implementing, as well as the structuring of this into a form that can be considered a data model, is outside the scope of this article. I start at the point that you’ve a completed data model delivered to you for implementation and you need to make this model available to applications and processes from within the JBoss BPM Suite.
Let’s imagine you’re part of a project team automating a process that determines if a customer of your financial institution has the right income and age to be considered for a car loan. There has already been a round of discovery workshops to uncover the process steps, which uncovers the data needed to complete the process. This data is modeled by someone in the project team and delivered to you as the project team member responsible for implementing this data model.
At this point, with your data model in hand, you’ll start the journey of implementing data objects for your process projects.
Data modeling tooling overview
 |
|
Figure 4.1. This example data model has been given to you for
implementation in JBoss BPM Suite. It consists of two data
objects; Department and Employee.
|
The data objects I’m using as an example to illustrate use of tooling are the following two objects:
- Employee
- Department
Getting started with data modeling
The first thing to do with a new design for your projects data model is to start implementing that model. This can be done by developers in the Java programming language using their favorite editors, or integrated development environments and given to your project, or you can use the data modeler provided by JBoss BPM Suite. I’m going to show you how to use the data modeler within the JBoss BPM Suite tooling as shown in figure 4.2. |
| Figure 4.2. An overview of the path you’ll take in this article is outlined. Inside the box are the steps to be covered, from the moment you receive a data model design, through implementation in JBoss BPM Suite, to the final data objects in your project for use by the rest of your team. |
Let’s get started modeling the data model we’ve been given. First, you need to log in to the Business Central console as in figure 4.3. If you haven’t previously done so, browse the documentation found in the tabs indicated by the arrows in the figure to get a feel for what is available in JBoss BPM Suite.
 |
| Figure 4.3. After logging in to the Business Central you’ll be at the home screen where you can browse the documentation. This home screen is where you start your work on data modeling. |
Next, you open the project authoring perspective to begin accessing and creating your data model. This is found in the Authoring menu as shown in figure 4.4; select Project Authoring to open the perspective where you see the data modeler.
 |
| Figure 4.4. The Project Authoring perspective can be found in the Authoring menu and opened by clicking on the Project Authoring entry. This will get you to the various authoring tools for any BPM projects you’re working on. |
Now that your project is in front of you, open the data modeler by selecting from the New Item menu a new Data Object. This produces a pop-up, shown in figure 4.5, where you can get started on your first data object, the Employee. You can provide the following details to get started with the Employee data object:
- Data Object : Employee
- Package : com.group.retail.hremployeerewards
- Persistable : (leave check box empty)
 |
| Figure 4.5. Pop-up to create a new data object. |
You finish creating the Employee data object by clicking on the +OK button, which opens the data modeler with the provided Employee details already inserted in some of the fields you see.
Now the Employee object appears in the data modeler within your Business Central console and you’re ready to interact with the data modeler to start adding data fields like name, department and employee number.
 |
| Figure 4.6. Data objects are put into packages in which they appear to have been hidden from the main Project Explorer default view. To find them you need to expand your folder structure. |
If you remember, you created the Employee data object with the package set to com.group.retail.hremployeerewards which translates to the folder structure of com/group/retail/hremployerewards/Employee.java in your project. Any time you wish to browse or select the data modeler for the Employee object, you need to first navigate down to this folder before it appears in the Project Explorer.
In figure 4.6, the Project Explorer is shown with the folder structure expanded.
If you click on the Employee object, it opens in the data modeler. Any time you’re looking for the data objects available in a project, you can follow this process within the Project Explorer to traverse your project and explore data model assets.
Taking a closer look at the data model editor
 |
| Figure 4.7. The JBoss BPM Suite data model editor where you create, modify and view data objects. |
In figure 4.7 you see the Employee data object in its initial state after opening it in the data model editor. Nothing has yet been created outside of a name and assigning it to a location in the projects package structure. This is at the starting point for further implementing the details of this Employee object. To start working with the data modeler you need to understand the layout of this editor.
You’ll use a few menu bar buttons while creating and updating your data objects. Let’s take a look at their actions in table 4.1.
 |
|
Table 4.1. An overview of the data modeler buttons as found on the top right of the screen. You can activate six actions by clicking on one of the buttons shown here.
|
Adding fields to a data object
 |
| Figure 4.8. The New field form will pop-up when you click on the +add field button in the data model editor. |
This pop-up is asking for the values that you can enter with the following values and shown in figure 4.9:
New field
- Id: name
- Label: Name
- Type: String
- List: don’t check this box
Once you’ve completed all the items for your field, you can submit them with the Create button or with Create and continue.
- The Create button submits and closes out the New field pop-up form.
- The Create and continue button submits your field and opens an empty New field form, allowing you to add multiple fields quickly.
 |
| Figure 4.9. This is the entry form called New field, used to add all the relevant information when adding a field to an existing data object. Here a field with an id, label and type with the values name, Name and String is being created. |
At this point I want you to use the Complete button to submit the field and close the form. This way you can examine your work as the data object editor now includes the name field in the list of fields in the left pane as shown in figure 4.10.
 |
| Figure 4.10. After adding the first field name, it appears in the data modeler. |
Click on the +add field button in the data model editor to create the employee id field with the data here, it should look like figure 4.10 after you submit with the Create button:
Employee id field
- Id : employeeid
- Label : Employee Id
- Type : Integer
- List : don’t check this box
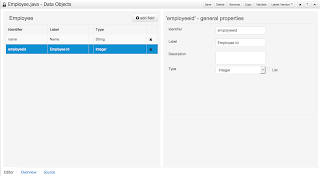
Figure 4.11. The Employee object in the data model
editor should look like this when you get done
adding in the employee id field.

Employee id field
- Id : department
- Label : Department
- Type : String (for now, see why in figure 11 description)
- List : don’t check this box
 |
| Figure 4.12. The Employee object in the data model editor should look like this when you’ve added the last department field. |
More to the data modeler than meets the eye
The data modeler offers a few tabs at the bottom of your screen, the first being the editor you’ve been using. The second is labeled Overview and it’s the next one that shows you what can be done with the Employee object you created.You can open the Overview tab by clicking on it; this reveals a window similar to figure 4.13. Note that this view contains the same main header and menu buttons on the top left or right as was covered in the editor.
 |
| Figure 4.13. The data modeler Overview tab provides all the details around the currently selected object. In our case it’s the Employee object. |
The section on the top left provides detailed information about the Employee object, such as its type, a field to add a description for this object, which projects use this object, the date this object was last modified, and when you created the Employee object. On the lower left you see the versions of the Employee object that you’ve saved in the past. The current version is listed at the top and it’s the one currently displayed in the data modeler. If you wanted to go back to one of the previous versions listed, you only have to select one and it’ll replace the current version of the data modeler. On the right you’ve a comments field where you can leave information for your fellow modelers.
If you click on the Metadata tab next to the Version history tab, you’ll see something similar to that shown in figure 4.14. This shows you an editor to add some extra, or meta, information about this data object. You can insert a tag name and click on the Add a new tag button. The Note field shows you the last save message for this object and the actual path to the object’s file in your project. The URI field points to the exact file for checking out the current data object from the GIT repository for this project. The Subject, Type, External link and Source fields are all free form text fields that let you put any information in them you deem pertinent for this data object.
 |
| Figure 4.14. The tab labeled Metadata will provide you with the chance to add extra information about the current data object. |
The last field, labeled Lock status, shows if someone has locked this data object by having it open in the data modeler editor, and provides a button that allows you to unlock it. Valid reasons to take away a locked object exist.
Imagine your colleague was working on the Employee object and left it open on his machine when he went away on an extended vacation. It might be nice to be able to access it after you’ve verified that the person isn’t going to be working on the Employee object?
Now that we’ve the Employee object open, it puts a lock on this behind the scenes that the next person, working on a different workstation and in a different browser, who attempts to open this Employee object finds it locked. It opens for them, but it’s shown with a small lock icon next to the name in the Project Explorer, and is only readable. They could use the Metadata tab to force an unlocking of the data object, but need to be aware that they’re possibly interrupting your work as you’re unaware that they’ve taken the data object lock away. This is a light form of locking, meaning it’s not informing anyone about who forces the unlocking, and everyone using the system is responsible for behaving nicely when taking away a locked object from another user.
Remember to save any modifications you’ve made in the Overview tab by clicking on the Save button found in the top right menu bar; it produces a pop-up labeled Save this item that allows you to enter a comment. For example, enter “Added metadata to Employee Object” and click on the Save button to save your data object.
Using the data model source
The last tab in the data modeler is labeled Source, and it provides a learning tool for those interested in looking inside data models. If you click on this, it shows you the actual Java source code generated for the data object you’re working on. In figure 4.15 you can see an example based on the Employee object you’ve been working on. It’s an example of my Employee object, but it should resemble yours closely, if not exactly. |
| Figure 4.15. The Source editor is the tab that provides a developer view of the actual Java source code that makes up your Employee data object. |
This Source editor is a free text editor without any developer tooling such as code completion or other help. It’s a view of what a Java developer would code in an integrated development environment (IDE) tooling, and could add to the project. The only point to note is that if a developer chooses to code their own data objects and add them to the project, they must implement the Java class java.io.Serializable to work with a JBoss BPM project. This is because everything in the project, behind the scenes during runtime, is serialized before being stored in the persistence layer (i.e. database) and unserialized when it’s retrieved from the persistence layer.
Furthermore, each data object that has fields is a Java serializable object with getters and setters methods. For example, the name field uses a getName method and a setName method. Be aware that this editor doesn’t support code completion or other fancy tooling, it’s a free text editor and you can easily break your data object if you aren’t careful. Use the Validate button before saving to ensure your data object is working.
Let’s take a look at what you can do if you decide to edit a data object by hand in the Source editor, to make sure you aren’t saving a broken data object. If you click on the source code and remove the last ‘e’ in the word Serializable on line seven from figure 4.15, you can validate the data object before saving by clicking on the Validate button in the top right menu bar. After removing the ‘e’ a pop-up box with a validation error should appear, as in figure 4.16.
 |
| Figure 4.16. If you’re going to be editing a data object’s Source, you’ll need to use the Validate button to ensure you haven’t broken your data object. |
As you can see, the Source editor is a quick way to fix something that needs to be done in your data object, but requires discipline to constantly validate that your changes haven’t broken anything. If you stick to the provided data modeler Editor, you never have to worry about these types of problems.
This concludes the excerpt. For an ebook copy go to:

[1] A formal definition can be found at http://www.webopedia.com/TERM/D/data_modeling.html, which states “Data modeling is often the first step in database design and object-oriented programming as the designers first create a conceptual model of how data items relate to each other. Data modeling involves a progression from conceptual model to logical model to physical schema.”
No comments:
Post a Comment
Note: Only a member of this blog may post a comment.